Showing posts with label how-to. Show all posts

Wednesday, November 16, 2011

Pretty Papered Boxes


Yesterday marked my 23rd birthday, and the start of my journey to becoming an old lady. At the same time, opening presents got me thinking about one of my favorite things to make with wrapping paper. This is the perfect project for this time of year for a few reasons. These make great gift boxes that you can reuse year after year (just use festive paper, add a bow and a tag :), they help get rid of wrapping paper you haven't used in a while to make room for the rolls you plan to use for the holidays, and they are an easy project for an overcast day. Besides, who says you need to wait for Spring to get a jump start on a little reorganizing? 

To make these covered boxes, all you need are a few things:
  1. An old shoe box
  2. Wrapping paper
  3. Scissors
  4. Clear packing tape
  5. Glue stick
Once you have your shoe box, start by cutting a  large rectangle around it. Measure the amount of paper you need similarly to how you would if you were wrapping a present. You will need enough to cover the bottom and sides with a little extra to hang over the edges. 

Next, fold up the paper to make creases around the perimeter of the bottom of the box. You should have four lines that create an outline of your shoe box in the middle and extend to the edges of your paper.

Now you need to begin trimming the paper. Cut down the folded lines to remove the rectangles created by your folds in the four corners of the paper.  However, on two sides, leave extra flaps on the edges in a trapezoid shape to be folded over the edge of the box. For a visual, see the picture above. To make sure my flaps were in the correct place, I folded the paper over the edge of the box and made another crease. I then cut down the edge to trim the extra from the top. 

Once you have your paper cut to the correct shape, you can start securing it to the box. Fold the edges of one of your sides of paper with the flaps up and over the top of the box. Glue the flaps to the side of the box first, then tape down the edge on the inside of the box. Do the same on the opposite side. Fold up the remaining two sides and again,  tape down the edges of the paper to the inside of the shoe box. I also put packing tape on the four edges where the paper flaps meet for a little extra reinforcement to protect against tears. Follow the same process for the lid of the box and you're done! 


These can be used to wrap presents or to store just about anything. I use mine to organize a number of different items such as jewelry, nail polish, important papers, pictures... 


I think these are a really cute way to organize a room. Just about everyone has little knick-knacks that can make a space look cluttered. This is an aesthetically pleasing way to keep them around without all the mess. They also make it easy to move your stuff. As a recent college graduate, I have moved to a new place almost twice every year for the past four years. Packing everything up can be a huge pain, but these fit easily into bigger boxes and make the process a little less stressful. Plus, they are a helpful way to recycle old shoe boxes. If you want to get a little more creative, you can make some slight alterations. It was more work, but in one case, I used wrapping paper on the inside of the shoe box and then made a collage around the outside (that box can be seen above in the middle). I covered the whole box with packing tape to make it more sturdy which was perfect to hold my nail polish collection.

Shoe boxes aren't the only recyclables that can be dressed up with wrapping paper though. Save an old soup can to make a cup for your pens or loose change. If I had the time and supplies, I would put kidney beans in the bottom with pens wrapped with florist tape to secure fabric flowers at the top to make a nice bouquet. Or if you plan ahead, you could turn these into lanterns or votive holders. Hammer a nail through the can before covering it (maybe in the shape of a heart?) and then after wrapping the can, poke the paper through the same holes (just be careful not to rip the paper). I think those could be cute hung with a little twine, but I don't really have the space to display a project like that.


Regardless of what you choose to make, I hope you have fun turning pretty wrapping paper into decorative items that can be used year-round. If you know of other similar projects, let me know! :]

Tuesday, November 1, 2011

Hooray for Cross-Promotion!

My last couple entries represented a fairly big step for me in the world of blogging - I made my first attempts at cross-promotion, and the results were much better than I expected. By posting two links on my own Facebook wall, I'm still only taking baby steps at this point, but that is an improvement, right? One thing I'm learning through this experience is why brands are often so hesitant to try something new. It is much easier to recommend to a team that they change their brand or execute a strategic modification than it is to do the same for your own. As this blog represents my personal brand, I was a bit afraid of what promoting it might do. The internet makes actions seem ultra permanent, because once you put something out there, you can never really take it back. What if no one liked my blog? That is why up until this point, I was happy writing in my blog even though virtually no one was reading it. However, through the experience I had the last few days, I can understand why cross-promoting is an essential on-line practice for brands.

Before I posted my first link to an entry on Facebook, this blog had achieved a total of maybe 20 views with no real signs of improvement. I had been sure to include keyword tags with each entry so that people searching those topics might find me, but my guess is that Google put me at the bottom of a LOOONG list of search results, so those alone were not driving traffic to the site. After I wrote about my experience making blue velvet cupcakes though, I was feeling brave enough to share the post with my social network of 900+ people. The change I saw was almost instant. I received 58 page views in just a few hours and I gained one follower who also texted me about how she planned to make an infinity scarf of her own (shout out to Helaina! :).

After seeing those results, I was feeling more comfortable sharing my posts, so I did the same thing with the Pumpkins and Power Tools post only with a small twist. I have to admit I did not do this consciously (I was just excited to share the cool pumpkin carving with my friends), but before I wrote and subsequently posted a Facebook link with the entry, I shared a picture of the Blackhawks pumpkin we had carved. Acting as a sort of teaser, I think that made more people interested in reading about how we had made the pumpkin. I was already getting more site views the second time around when something amazing happen - I got my first brand advocate! Yay!

With zero prompting from yours truly, my sister posted a link to my first entry on her own Facebook. Suddenly my audience had expanded from 900+ to include an additional 400+ (we have 80 friends in common) and I received my first comment and hit 154 page views in less than 24 hours! I think that is pretty good considering that came from two little links.

If I could generate that traffic with my own social network, I can only imagine the potential cross-promotion has for brands. Even though I had already learned as much through my undergraduate studies, this gave me some first hand experience with the power of strategically using social media.

My challenge for the next time is to do better than 154 views, and there are a few steps I plan to take in the future to accomplish that:

  1. Include other sites - at this point, I posted the link on Facebook alone. Hopefully by including Twitter, I could reach another audience.
  2. Encourage my brand advocates to post for me as well... If you liked this post, please share it with your friends! :)
  3. Work on joining on-line communities - there are sites like Wanelo.com where users share projects like the ones I have blogged about. If I can participate in the right conversations, there is no limit to the audience I might reach. 
Now that I have overcome my reticence to cross-promote, perhaps it is time for me to think about monetizing the site...

I know that the possibilities of cross-promotion are endless and that I surely have not thought of them all... What other tactics do you think I could use to drive traffic?

Friday, October 28, 2011

Saved by the Decorations... Almost

I suppose since I promised I would be honest, I have to admit to the tiny... I mean, pretty epic failure I experienced today. Here is what happened.

Not too long a ago, I spent a significant amount of time putting together a recipe book which I am fairly proud of. Lots of pictures, laminated pages, yummy recipes... it's awesome. Well I had my 8-year-old cousin to entertain this morning, so I thought that it would be a great occasion to bust out some of the new cupcake recipes I had found. Plus, with a friend's birthday this weekend I thought that further made it an opportune time to bake.

Well, not to place blame, but I woke up this morning in the mood for devil's food with ganache topping (I'm really not much of an icing fan. I tend to scrape it off because it's just too sweet for me), but Abbie wanted to try the Blue Velvet Cupcake recipe. I agreed because I love red velvet, and the cupcakes did look super cute. The recipe is listed below with instructions:

INGREDIENTS
Cake:
  • 2 cups sugar
  • 1/2 lb (2 sticks) butter, at room temp.
  • 2 eggs
  • 1 tbs. Wilton royal blue gel food coloring
  • 1 small dab of violet gel food coloring
  • 2 1/2 cups cake flour
  • 1 tsp. salt
  • 1 cup buttermilk
  • 1 tsp. vanilla extract
  • 1/2 tsp. vinegar
Frosting:
  • 1 (8 oz.) package cream cheese
  • 2 sticks butter, softened
  • 1 tsp. vanilla extract
  • 4 cups sifted confectioners' sugar

DIRECTIONS
  1. Preheat your oven to 350 degrees and line cupcake pans with liners - makes about 26.
  2. Cream sugar and butter in mixing bowl till light and fluffy, then add eggs one at a time, mixing well after each egg.
  3. Mix cocoa and food coloring together to make a paste. Add this paste to sugar mixture and mix well again.
  4. Sift (or buzz in food processor) flour and salt, and add to creamed mixture a bit at a time, alternating with buttermilk, then mix in vanilla.
  5. Combine baking soda and vinegar in a small bowl and add to cake batter; mix just to combine.
  6. Scoop thick batter into cupcake liners, filling about 2/3 full, and bake for probably 25-30 minutes, but start checking at 20 minute mark; watch for toothpick inserted in center to come out clean.
  7. Remove cupcakes from oven and allow to cool completely on a wire rack.
To Make Frosting
  1. Beat cream cheese, butter and vanilla with electric mixer until nice and smooth.
  2. Add sugar gradually and beat on low until combine, then beat on high speed until very light and fluffy.

Our beautiful and tasty blue batter
Everything started out great. Abbie and I were skeptical about the amount of food coloring (1 tablespoon seemed like an awful lot!), but it made the batter a beautiful shade of blue. When the batter was done, it tasted wonderful and we were ready to start filling our cupcakes. That's when things started going down hill. 

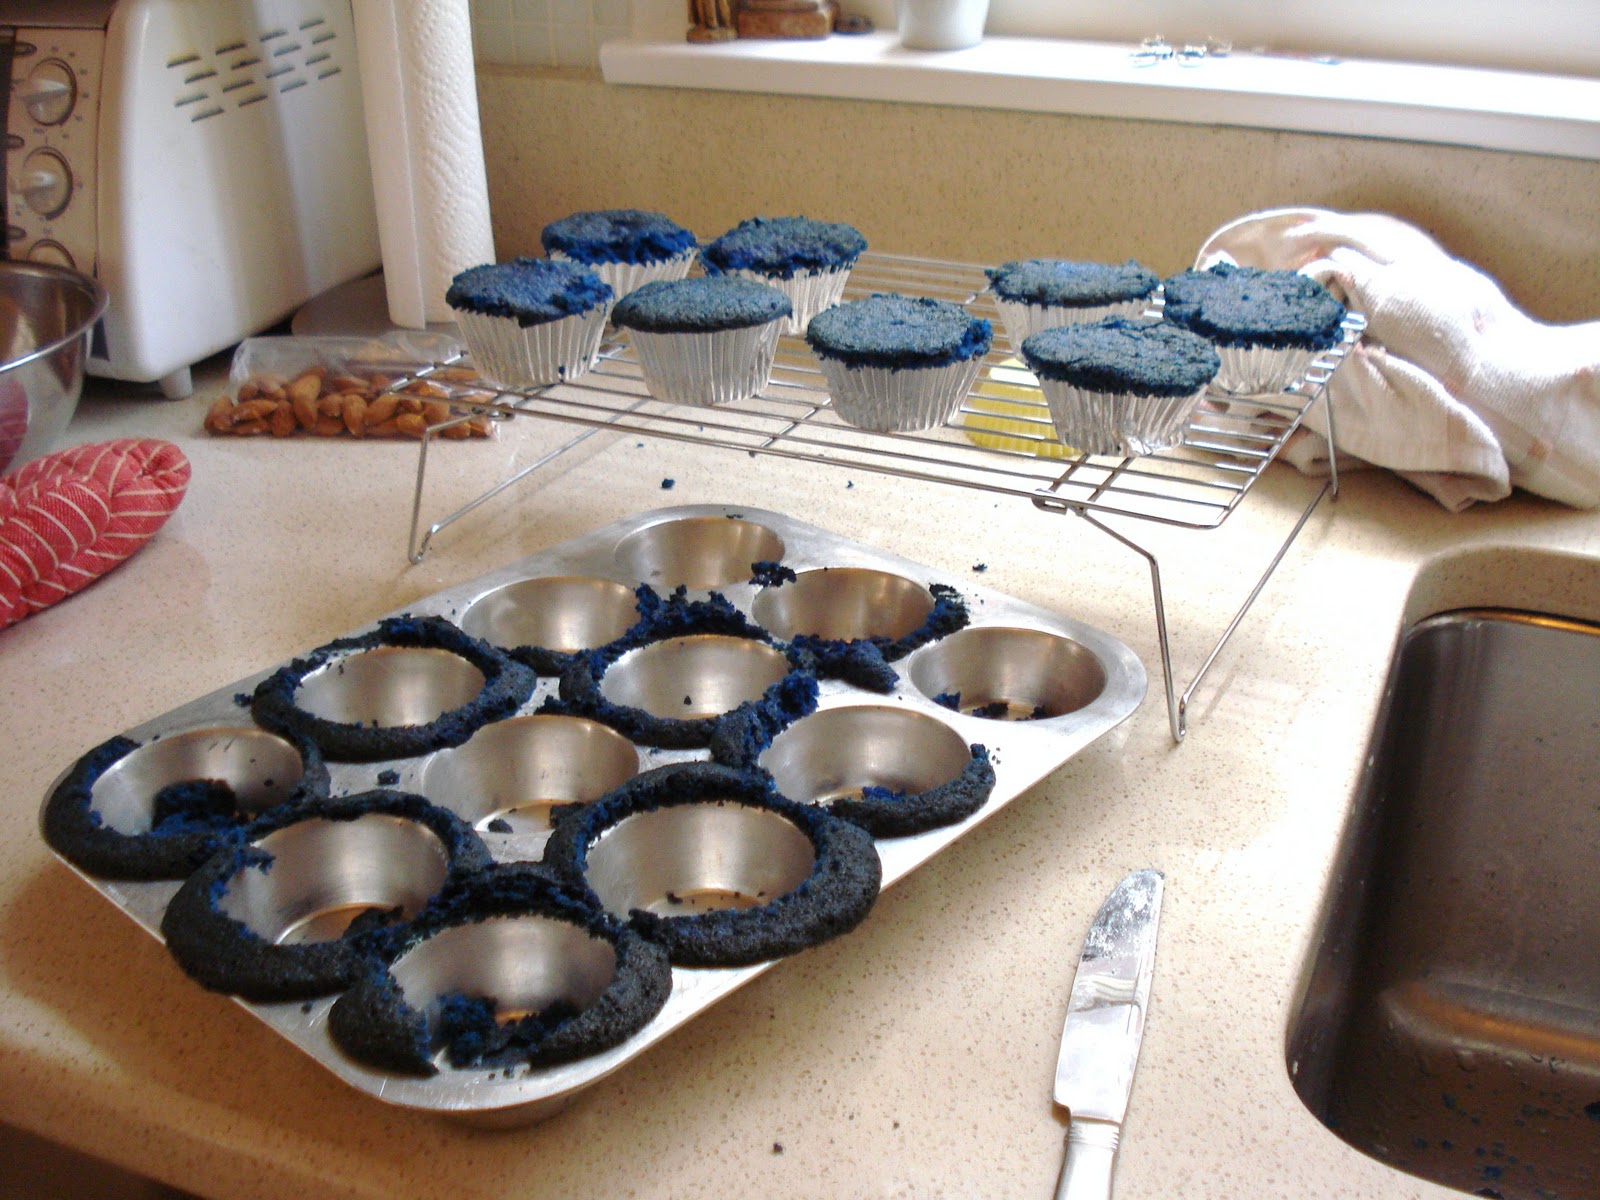
First, the recipe and instructions say that it will make approximately 26 cupcakes and that you should fill your papers 2/3 of the way up. Well, we made 26 cupcakes, but 2/3 is WAY to high. About 15 minutes into baking, the cupcakes started overflowing. There was nothing we could really do except watch the batter topple over the edges and start to burn. I wanted to pull them out early, but even after 23 minutes, my toothpick wasn't coming out clean. I ended up cutting around the cupcakes that had overflowed with a knife to trim off the burnt edges and get the treats out of the tin. And although they were pretty darn ugly, the cake itself had a really good flavor. 

At this point, we thought that maybe adding the frosting would help cover up the imperfect edges and no one would really care that we made ugly cupcakes. Well I should have known better than to use a cream cheese frosting. It just is a flavor that my family doesn't really care for too much. Also, it was extremely soft... Not the best frosting to use when you're trying to cover up an ugly cupcake. Abbie gave one to our grandpa to try and it started dripping all over him. I ended up putting them in the fridge uncovered for a little while to get the frosting to harden. I'm a bit afraid to take them out now though. 

In the end, I guess they didn't end up a huge disaster, and we did have a few successful cupcakes, but as a whole, I was disappointed. I am a perfectionist, especially when it comes to making my own work aesthetically pleasing so this was a very frustrating morning for me. However, my experience with a group of guys is that they typically are not too picky. So hopefully these will go over a little better at the birthday party tomorrow. That being said, there are a few adjustments I would make to this recipe for the next time. 

Cupcakes chilling in the refrigerator
  1. Fill the cupcake papers only half full. Two-thirds is far too much.
  2. Use a different frosting. These are very rich cupcakes, and a sugary frosting seems like too much. It might not be as pretty, but next time I think I would use a chocolate ganache or less sweet chocolate frosting and brush the decoration with edible gold paint.
  3. OR if you like the cream cheese frosting, make sure everything is chilled before you use it. Also maybe use a little less sugar.

I'm not giving up on this recipe just yet because the cake has a very good flavor, and I think they have the potential to be super cute. Especially paired with some red velvet cupcakes, I think they could be a big hit at 4th of July parties in the Summer. If you are brave enough to try to conquer blue velvet, let me know how it goes! Happy baking :)

Wednesday, October 26, 2011

First Project: the Infinity Scarf

This fall, one of the trends I have been most attracted to is the chunky infinity scarf/mobius loop/circle scarf/whatever you choose to call it. I taught myself the basics of how to knit back in high school, so when I decided I wanted to make one, I searched the internet for a pattern that I liked, and picked this one. I used a moss stitch for the first time and found that it really wasn't hard for someone with minimal experience. These are the materials I used:

  • 2 skeins - Lions Brand Yarn, Nature's Choice Organic Cotton
  • US 9 or 5.5mm circular needles - Clover Brand
  • scissors (to trim excess yarn from the ends)

Fairly simple, huh? I chose the Nature's Choice Organic Cotton because the yarn was very soft (I'm a sucker for anything soft) and did not contain any animal hair. Anything with wool, angora, or other animal hair in it makes me feel really itchy and uncomfortable so I try to stay away from it as much as possible. 

And now for the fun part... making the scarf :]

If you have never knitted anything before, this video breaks down how to make your slip knot and cast on. I prefer to cast on this way though.  

To start, I cast on 95 stitches onto my needles. This will make a scarf that is long enough to wrap around twice. If you don't want to wrap your scarf more than once, I would recommend using close to half the number of stitches (and a shorter set of circular needles). Regardless of how many stitches you choose to use, you will need to pick an odd number to avoid too many headaches while using the moss stitch. 

After I had cast on all of my stitches, I flipped my needles so that the last stitch I had cast on was in my right hand, and the first was in my left. Before continuing, you may want to place a marker on your needles in front of the first stitch. I started my first row by continuing to knit from the last stitch I had cast on into the first stitch using a knit stitch. If you need a visual of what the project should look like at this point, check out this video (contrary to what she recommends, you will want your stitches to have a twist in them if you want to make a mobius loop like the scarf pictured below).

After the first knit stitch, I continued a pattern of purl 1, knit 1, purl 1, knit 1... (you get the picture) to the end of the row. You should end with a knit stitch. These videos provide tutorials on how to knit stitch and purl stitch if you are unfamiliar with the techniques. For the moss stitch to work, I alternated between the two stitches which meant I had to bring my yarn to the front or back of the needle each time to start the next stitch. So, before you complete a knit stitch, the yarn should be towards the back of the needle or away from you, whereas before you complete a purl stitch, the yarn should be on the front side of the needle or towards you. Here is a short video demonstrating what I mean.

Continuing with the purl 1, knit 1 pattern, I began my second row with a purl stitch. This is important to make the moss stitch work. You should always be knitting a purl stitch into the previous row's knit stitch and vice versa. Use this pattern for every row until you finish your scarf. The pattern I used recommended knitting 23 rows, but I chose to use about double that. I found that 2 skeins of the yarn I was using gave me the size scarf I wanted, so I didn't worry about the number of rows. Instead, I just kept knitting until I had used that amount of yarn. If you decide to do the same, you will need to add in the new yarn about half way through the scarf. If you want, you can just tie the ends together and clip them, or you can combine them the way you technically should by kitting the tails back into the work. This is a helpful video about how to do that.

Once you have achieved a scarf with your desired number of rows, be sure you have left enough yarn to bind off and finish your scarf.

After I made my first scarf, I decided that the pattern was easy enough that I wanted to make more. I made one in khaki for my mom, cream for my sister, and kept the green for myself. The colors were so pretty though, I wish that they lived close to me so that I could steal - I mean borrow theirs ;]


With Halloween just around the corner, I thought it would be cute to make some festive cards to send off with my scarves. I picked up a pack of blank cards with envelopes from Target and decided to check out Etsy.com for design inspiration. This is what I came up with. You can also make your own cards, or buy one like the one I made here. I know that it's sometimes easy to cross the line from cute into tacky, but I have found that usually when you make it yourself, people tend to be more forgiving of the tacky haha. For my mom, I made a card with witch shoes because when we were little, we had a Halloween decoration that looked like the Wicked Witch of the West had crashed into our door with her little legs peeking out.


For my sister, I made a card inspired by another design I found on Etsy.com. It was a design embroidered on clothing for little boys and girls, but unfortunately, I could not find the link to add it in my entry. I left her card simple, with just the design on front and my letter inside. Thank goodness the post office has flat rate boxes, because that made shipping easy! :]


And finally, we have me in my scarf pictured above to the right. I had a lot of fun working on these projects and I hope you do too! If you have any questions or would maybe like to commission me to make one for you, contact me, and we'll work something out ;] Happy knitting!

Monday, October 24, 2011

Hello world!

Welcome to my newest blog! :] Now, I have tried the blogging thing in the past, but aside from a Xanga I am embarrassed to say I kept up regularly in middle school, my previous attempts have not gone very far. So, I am hoping to have better luck this time.

The biggest issue I have had when it comes to blogging is finding my voice. My problem is that I studied social media in college, and what I have learned about using blogging as a tool tends to conflict with what I really want to write about. Currently, I am a recent graduate of Miami University with a degree in Marketing whom is looking for full-time employment. The articles I have read about "using social media to enhance your job search" (or something along those lines) would recommend that I use this blog as a platform to share my knowledge about digital marketing. To make it a place where I post interesting articles I find with a witty accompanying paragraph or two. Then, hopefully my established online personality will be attractive enough to a company/brand that it will recruit me to manage its online presence. Unfortunately, social media is not the only thing I am interested in writing about.

I have always been a very creative person, and to be honest, the times I am most likely to read a blog are when I am researching a new artsy project I want to start. Those are the blogs that make me attracted to the platform. They inspire me to want to join those communities and conversations. To start my own blog about painting, various craft projects, baking, fashion, etc. But seriously, how am I supposed to pick just one of those topics to be interested in?

Most blogs today are extremely specialized. Authors make money writing blogs because they become experts in one specific area. So, for example, if I am interested in baking and art, and I want to be credible in those respective communities, I need to start two different blogs. Oh, and in order to keep my audience engaged, I need to write posts on a regular basis with new content. Well that is a LOT of work... not to mention, I am also supposed to be writing about social media, right? Now because I am interested in three topics, I need three blogs?? Holy cow. This whole blogging thing is starting to make me feel schizophrenic. If the point of being a blogger is to manage an online personality, then why can't my blog be multifaceted like a REAL person? Well I am hoping that it can be. Which brings me to what I aspire to accomplish with this blog.

In nearly every interview, I have been asked by a recruiter where I want to be in the next 5-10 years as well as about what I like to do in my free time. Well, I hope that through this blog, I can work on getting to where I want to be in the future while enjoying what I like to do today. I plan to share and apply the principles I have learned about blogging and establishing a personal brand online while also writing about the art projects I like to take on in my spare time. A sort-of combination of "how to" and "DIY" material. I am not sure if I will be successful, but I am sure going to try.

Thank you for stopping by and sharing this small part of the journey with me! Please feel free to leave comments or suggestions, and come back to see where this goes in the future :]